Step 2: Connecting Power to the Hub
To connect power to the hub:
| 1. | 1. Connect the power cable into the 3-prong power connector on the front of the hub, as shown below: |

| 2. | 2. Insert the other end of the power cable into a grounded outlet in the wall, a power strip, or a grounded extension cord. |
Warning: DO NOT USE ANY ADAPTER PLUG between the power cord and the outlet because this may result in electrical shock to humans or damage to the hub.
Power-up LED Test
Once the hub is mounted, verify that its light emitting diodes (LEDs) are functioning properly by using the procedure in this section.
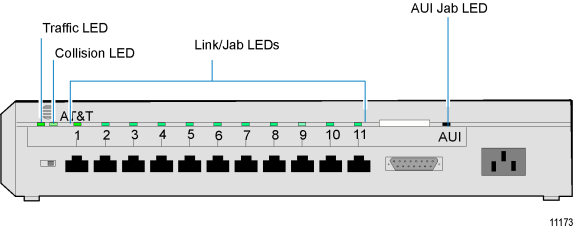
To verify that the LEDs are functioning properly, follow these steps:
| 1. | 1. Remove the power cable from the hub (it has no power switch). |
| 2. | 2. Reconnect the power cable to the hub, and observe the LED activity, as follows: |
| a. | a) For approximately two seconds after power is initially applied, the following LED activity should occur. |
|
LED |
LED State |
|---|---|
|
Traffic |
Off |
|
Collision |
On |
|
Link/Jab |
On Red |
|
AUI/Jab |
On |
| b. | b) After two seconds, the LEDs should return to their normal states. |
|
LED |
LED State |
|---|---|
|
Traffic |
Off |
|
Collision |
Off |
|
Link/Jab |
Link/Jab Off (On Amber if Link Integrity is disabled) |
|
AUI/Jab |
Off |
Note: If you are running this test with any of the twisted-pair wire jacks connected, the status of the Link/Jab LED may vary randomly. Therefore, NCR recommends that you disconnect all jacks before performing the power-up LED test.
If all LEDs remained OFF:
| 1. | Make sure the power source is functioning by plugging another device into the receptacle. |
| 2. | Try a new power cord. |
| 3. | If there are any other deviations from the power-up sequence in the last series, return the hub to the original place of purchase. |